Pages

Tripoly

We did a little switching this week so we could have a special guest post tomorrow :)

When I got married I was introduced by my husband's family to a game that I had never heard of before. This game is Tripoley. I don't like that spelling and didn't realize that's how it was spelled until I looked up information about it for this post. We play by our own house rules therefore I feeling I can change the spelling as well :) My sister-in-law and my in-laws have homemade versions of this game and when we wanted to share this game with our friends this week I thought I'd make our own board. Here's how it turned out:

To play Tripoly you will need:
  • Poker chips (two sets=200 was good for a game of 4 but to play with more you may need a larger set.
  • A deck of cards
  • A place to put 8 sets of chips-you can use bowls or make a board like me :)
To make the board:
  • I got a foam board at the dollar store- love that place!
  • With a pencil I drew the center lines of the board and diagonal lines from each of the corners through the center. I then traced a styrofoam bowl for the areas which are:
    • Ten of hearts, jack of hearts, queen of hearts, queen and king of hearts, king of hearts, ace of hearts, kitty, and 8,9,10 of one suit. 
    • There needs to be a place in the middle to put your bets.
  • I cut letters out on my Cricut with my Cuttin' Up cartridge. You can also use stickers. 
  • I then traced the circles with marker and erased the pencil lines.
  • Last I covered it in clear contact paper to seal it off.
Total cost: $8.89 for one set of poker chips :) and the foam board, I had all the other things.

Here are our house rules. Like I said they are different than the actual rules but we feel this is more fun.This is a combination of poker and Michigan rummy (which I have never played or heard of). There is an addition of hearts too in the other rules that we don't play. 

Round 1- Poker
  • Deal all the cards to players plus one. For example if there are 4 players deal five hands. The dealer can trade their hand for the extra hand or sell it to the highest bidder. They can not look at both hands. Once they decide to look at the other hand their previous hand is dead which is the same if a person buys the hand.
  • Ante up by putting a chip in each spot and one in the middle- 9 all together.
  • With the cards you pick five of them that constitute your best poker hand. On my board in each corner I put the hierarchy of poker hands because we can't ever remember what they are. 
  • Starting with the person to the left of dealer you start betting just like poker. You can check, see or raise the bet, or call. All chips for betting go in the middle.
  • The winner of this round gets all the chips in the middle.
Round 2- Michigan Rummy
  • Using the cards from the poker hand and all the rest of your cards you then start with the 2 of clubs and go up in sequence. During this part you will be forced to stop when a card is not available to be played. This can be for a couple different reasons: it has already been played or it is in the dead hand.
  • If no one has the next card the person who put down the last card can start a new sequence. It has to be in the opposite color the last sequence was. For example if the last card was a black 10 and no one had the Jack then the person who played the 10 would then have to play a red card. You can start with any number for a sequence after the first round where the 2 of clubs is played. 
  • If the 10, jack, queen, king, ace, or king and queen of hearts is played that player gets the chips in that section. Also if you have 8,9, and 10 of the same suit you get those chips. The chips in each section don't get taken every round. 
  • Whoever goes out first gets the kitty. All other players put chips in the kitty for the number of cards they had left which the person who won the round gets as well. 
  • Play starts over with a new dealer and the poker round. You can play a certain number of rounds or until one person has all the chips which would take forever.
Enjoy! 


Summer silhouette painting: rough draft (project in progress)

Happy Memorial day! We're grateful to all those who have helped to preserve our freedoms.

Don't forget: today is the last day to submit your version of Jaime's scrapbook sketch!

Some people in our family have natural talents with the visual arts. I'm not one of them.

I'm okay with that. But every once in a while (Who am I kidding? I'm Wayward! This happens all the time!) I get an idea for a craft in my head and I want to make it whether I really know how to use these media or not.

In this case, I've had a vision for my daughter's room basically since she was born. I haven't gathered the courage to do it yet, but after seeing this silhouette painting tutorial on Sisters of the Wild West, I'm inspired to make it happen.

What I want to make:
A framed silhouette painting. Since it's the unofficial beginning of summer, the painting is inspired by the carefree whimsy of summer and childhood. I want to paint it in the colors of my daughter's room: cream background with a rose pink silhouette.

I've been planning to make a computer graphic of the picture I had in mind and use a computer project to project it onto a canvas to paint.

Here's the rough version of my image, a collage of Creative Commons licensed Flickr images:


I'm still thinking about and tweaking the individual elements, of course. I've been consulting with Brooke, resident painting expert, on exactly how to make this happen. She advised me to use a pre-stretched canvas (which is a lot cheaper than I thought if you're using a standard size) and said that the latex paint we used on the walls would work fine as long as it dries between coats.

I'll keep you posted on my results!

What do you think? What would you put in a summer silhouette painting?

Photo credits from the collage: water—Lois Elling; sitting person and his other leg—Chris Palmer
tree—Laura Nolte; tire swinger—Amit Kotwal

Jewelry Holder

I don't have lots of jewelry, but I have enough that it was a pain to find what I wanted each day. I saw this idea on a friend's blog and decided to try it myself. I love it! I can see all my pieces at once. I wear different pieces more often because they aren't hidden away somewhere.

I just bought an inexpensive bulletin board and just measured where I wanted the pins to go. TADA! Done!

My friend covered hers with fabric, but I just left mine naked!


Caramel and Chocolate Drizzle Chex Mix

I'm a fan of food. Before my first semester of college, I experimented with baking and tried out some new things. One of those new things was homemade Caramel and Chocolate Drizzle Chex Mix (yes, I did just make that name up.) It's one of the recipes I've since repeated and still enjoy. I followed their recipe just for the caramel part and added in the chocolatey goodness.

Ingredients:
8 cups of Chex
3/4 cup packed brown sugar
6 tablespoons butter or margarine (but we all know butter tastes better)
3 tablespoons light corn syrup
1/4 teaspoon baking soda
Chocolate, however much and whatever kind is up to you but you can start with 1/4 of a cup

*You should have a cookie sheet lined with wax paper set aside along with the 8 cups of Chex in a microwaveable bowl.

Here's how we make the deliciousness! In a 2-cup microwaveable measuring cup (or a bowl), microwave brown sugar, butter and corn syrup uncovered on high for 1-2 minutes. Stir after every 1 minute, until melted and smooth. Stir in baking soda until dissolved. Pour over cereal and stir. This is sticky and won't cover everything but don't worry! Take the bowl of coated cereal and microwave on high for 3 minutes, also stirring after every 1 minute. I found that using 2 wooden spoons, greased, helped mix everything and reduced spilling.  Now spread the evenly coated Chex onto the cookie sheet lined with wax paper. Spread out the pieces to avoid large clumps. Break apart any large clumps.

In a small microwaveable bowl, heat the chocolate. Either dip the pieces in or drizzle over cereal with a spoon. Let everything set and cool. Then, enjoy!

(This is dipped instead of drizzle)

For more Chex Mix recipes check out their website.

Label vinyl canisters

I always stock up on flour and sugar (white, brown, and powdered) when they go on sale. I was then left with chaos in my dry baking goods because there were multiple bags opened and spills even though I tried putting them in plastic bags and other solutions. We also had a bad ant problem last year which included that shelf. Some how granulated sugar drew in crowds of ants-imagine that! So I knew I had to do something. I had already wanted to try vinyl with my Cricut and was planning on labeling my counter canisters so I decided to get a better solution for the flour and granulated sugar.

I got two large glass containers from Walmart. They were on sale I believe for $7-9 each. I made sure before I cut the vinyl that I cut them out of scrap paper first and instead of transfer tape I used purple (cause I love that color) masking tape. I used my Cherry Limeaide Cricut cartridge. I was lucky because I didn't measure the pantry and they fit perfectly inside. Here's what they look like:
They each hold about 4-5 bags.

The canisters on my counter.

Wayward Girls' Scrapbook Sketch

My crafty roots are in scrapbooking. As my mom shared, I've been scrapping for a while. My sister, Jordan, challenged me to make my own scrapbooking sketch this past week. I'd like to share my first sketch with you:


 I made my sketch with one of my latest scrapbook layouts in mind:


I would be flattered if you used my sketch. Please link up if so. If we get 5 layouts or more by next Tuesday (5/31/11), I'll do a random drawing for some scrapping goodies!


Pineapple Upside-Down Cupcakes

Or as I like to call them, pineapple CUPside-down CAKES.

Well, I thought it was clever.

So last Wednesday, my husband came home and announced that we needed to make a cake. My first thought was, "Score! I know what I'm blogging about next week!" My second thought was, "Why?"

Turns out the woman who makes wonderful cakes for everyone else's birthdays had her birthday—on the previous Sunday. After enjoying many of her dark chocolate/strawberry/whip cream leftovers, I knew this cake needed to be special. I'd just seen something about a jellybean cupcake decorating contest. While I don't think this will win any prizes there, I was inspired to use cherry jellybeans instead of maraschino cherries in this:


To make the pineapple upside-down cupcakes, I started with a yellow cake mix. The box called for a cup of water; I replaced half of that with pineapple juice (but the flavor was very subtle in the end, perhaps not even worth it).

Then I consulted a recipe for PU-DC. It called for a brown sugar sauce made with melted butter and brown sugar. Add just a little water and it turns into this:
I opened a poured in a drained can of pineapple tidbits (but I don't recommend this: it did something weird to the butter and looked super nasty. Instead, just pour the brown sugar sauce over the pineapple once they're in the cupcake liners).

I was worried about the brown sugar syrup leaking through paper cupcake liners, so I used foil+paper liners.

Fill the lined cups with the jellybeans first (cut in half), then the pineapple and brown sugar sauce (use a spoon to strategically place the jellybeans and fruit), then a scant scoop of batter:

I tried to make sure the batter touched the sides of the cupcake liner (but with the fluting, I couldn't really get a "seal" to the sides).

Bake as per package instructions:

Very carefully peel the paper off (the jellybeans may stick to the liner, so you might have to rescue them).

The dye from the cherry jellybeans did run a bit, and the effect wasn't so great. Interestingly, the batter pushed the pineapple out to the edges a lot of the time, leaving a pineapple ring:

All in all, they were a little more work for a much more impressive effect than just a cake mix.

What's your favorite kind of cupcake?

Handmade Boxes

Do you have old greeting cards lying around that you don't want to throw away, but yet you don't really have a use for them? You can turn them into small gift boxes! My mother taught me how to do this a long time ago, and I have made tons of them over the years.

You need old greeting cards or other cardstock or heavy paper and scissors. (That's all, no glue or tape!)
For your first attempt, just use cardstock.

Cut 2 squares. The square for the top should be 1/4" larger than the square for the bottom of the box. (I used a 4 1/4" square and a 4" square.) On the backside of each square, draw diagonal lines from each opposing corner so that you can find the center of the square. Fold each corner in to the center point.

Once you have folded all four corners, open up 2 opposite corners. Fold a second time as shown below.

Fold the opposite side in the same manner, then open those 2 sides. Now repeat the process on the two remaining sides. Open all the way. You have made a series of folds that should look like this:
(I drew lines on all of the folds so that you could see them. Don't do this on your box.

Now you are going to make 4 cuts as shown in dark lines below. Be sure to stop exactly where shown.


Now you have 2 sides that are triangles and two that are squares with small triangles on top. Fold the tips of the large triangle sides to the center of the box. Now, on the second folded line, fold up 90 degrees. Fold the flaps in toward the opposite side. As you repeat for both sides, these flaps will overlap.

The next step is hard to explain, so here is a quick video to show how to do it:


You are done! Repeat with the smaller square and now you have a top and bottom. You could make a series of nesting boxes by decreasing the size of the square by 1/4" each time.

Now... to use those cards. Cut a template square for the top. Usually 4 1/4" will work, but you might need to vary it depending on the size of your card. Make all of the folds in your box, but don't make the cuts.
You will see a center box in the template. Carefully cut out that center box. Now you will be able to use this a frame to pick out the prettiest part of the card for your box.

There is really no limit on how big you can make these boxes. You could use poster board and make a giant one! If you do, send us a picture!

Families

Sorry it's been a busy day! For Christmas I made these for Jaime and Brooke (this Christmas Jordan will get one) the past couple of years. We believe in eternal families that start through marriage. Here's more on what we believe.
Here's how to do it!

You need is an 8x10 wedding portrait, a picture frame and a piece of translucent paper. For Jaime, her wedding colors were pink so I chose pink translucent paper but I couldn't find Brooke's color in time for Christmas. Adding color is a cute touch of the wedding. Easy beezy! I chose cute a candid of the bride and groom for both sisters. Also, I chose photos where they are standing somewhat apart so the line in the Family Proclamation doesn't end up cutting through either of them (especially their face!) All you need to do is print the Family Proclamation on the translucent paper. Then layer the pictures and put them in the frame. Bada bing bada boom, there you have it! Simple and beautiful.

The Crib Skirt That Almost Wasn't- Crib Skirt Tutorial

I have been looking into decor and theme for the nursery for my baby girl since of course I found out what I was having. I love living in the south and I decided on a Colonial South/French Country. Here are a couple pictures I used as inspiration: Project Nursery and Design Dazzle.

The color scheme that I wanted was a dove grey and a deep purple. I didn't find the exact fabric that I wanted when my mom and I looked at the store and semi-settled for a still beautiful purple fabric (DISAPPOINTMENT #1). I got all the fabric they had and we worked on it from scratch. Here are the steps we took (in italics I will explain what really happened):


  1. Measure the long and two short sides of the crib (We really did four panels. Why? The other panel would have never been seen and we got rid of it later and used it as the other half of the front. In the end it was four times the length in the front and very gathered)
  2. We doubled the length and used the surger to surge all four edge of each of the panels. (This actually wasn't bad)
  3. We pressed a one inch edge at the top and a two inch panel at the bottom of each panel and sewed it. (Again no problems)
  4. Gather. We chose to thread a yarn the length of the actual edges of the crib and gathered. (Here is the step where we realized we made one too many panels)
  5. We cut four inch strips the length of each of the panels and pressed them in half
  6. We sewed the strips to the panels to hold them there. Surge them together with a cutting edge. (After breaking FIVE yes FIVE needles we resorted to just resewing them to reinforce them)
  7. We sewed ribbons to the panels around every 10 inches. (Again I was breaking needles-very disappointing day) You can readjust the crib skirt as the crib is lowered. 
  8. We tied them to crib and yay! (There's a drawer under our crib and the sides of the drawer block the crib skirt from reaching the ground. I think I almost started crying about right now. I pinned them up with safety pins and declared it DONE)
Here's a picture of the final result. Good luck (you'll need it!)!!


Heaven Sent Baby Shower, Food and Activities

Last week you remember I showed you the decor for our Heaven Sent baby shower. This week I'm sharing the food and activities from the shower.

First, let's go with the food, since I love to take pictures of it.

Photobucket

These Oreo Truffles were a big hit. We used lollipop sticks (purchased at AC Moore) and ribbon to jazz them up. I wrapped a block of floral foam ($2 at WalMart) in wrapping paper and we topped it off with ribbon. Did I mention how DELICIOUS they are?

Photobucket

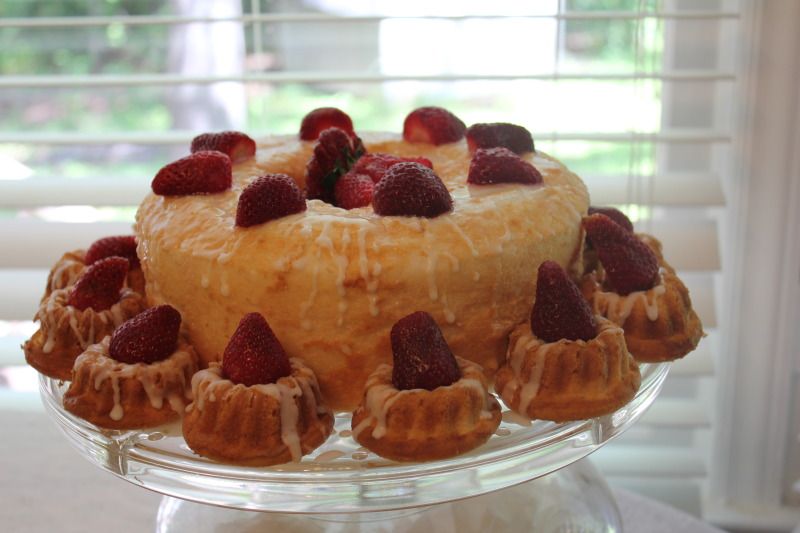
Angel food cake is a MUST at a Heaven Sent shower. I bought this pan for $11.99 from WalMart.com. It wasn't the easiest to work with, even for my mom who is an experience cake maker and decorator. We eventually used white cake for the smaller cakes and purchased a large angel food cake. My mom made a simple powered sugar glaze for the top and some left over strawberries from....

Photobucket

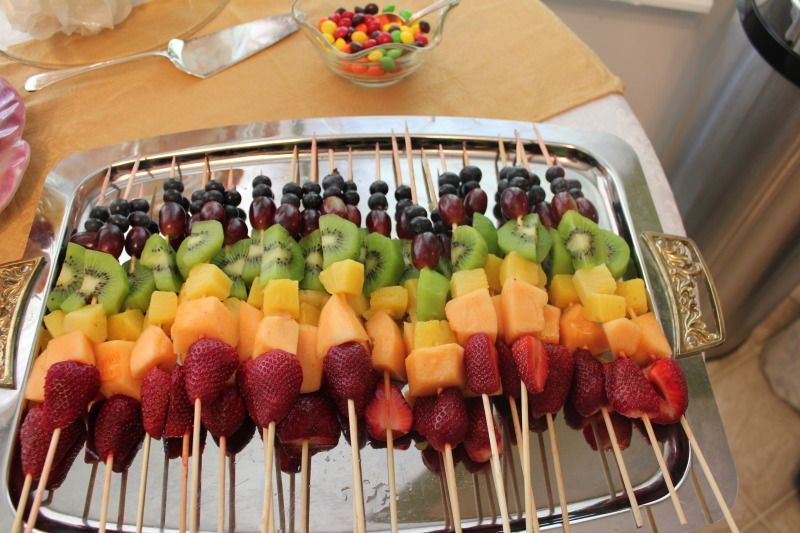
 These rainbow kabobs. We chopped the fruit the day before and then assembled the kabobs the day of. It was very easy. I think I'd try to find some shorter skewers next time. Inspiration here

Photobucket


We made these "Individual Crudites" as Martha Stewart calls them. Since she thought of 'em, we'll go with that. I called them baguette cups. We purchased baguettes and cut them on a diagonal. Next we hollowed them out half way and filled the bottom with hummus or ranch dip. Then we inserted chopped veggies. Everyone was talking about them.  


Photobucket


The whole food table. My best friend brought beautiful flatware for us to use and this punch bowl.

Photobucket

I think Brooke enjoyed the food ;)

Photobucket

Now for the activities!


As guests were arriving, we had them fill out this little card. It gave them something to do. Sometimes I feel awkward at the beginning of showers, so it was kind of an ice breaker. It comes in different colors, we used the gray/pink combination.

Next we had a little quiz about Brooke and her husband as babies. My mom and I came up with the questions and we thoughy the answers (at least for Brooke's questions) were SO EASY! We were wrong, no one got more than one answer for Brooke's section correct. It was fun to find out about Brooke and Mr. Brooke as kids. We had pictures to go along with our answers and then had them displayed for the guests to look at afterwards. The winners got Skittles and Snickers, the couples' favorite candies.

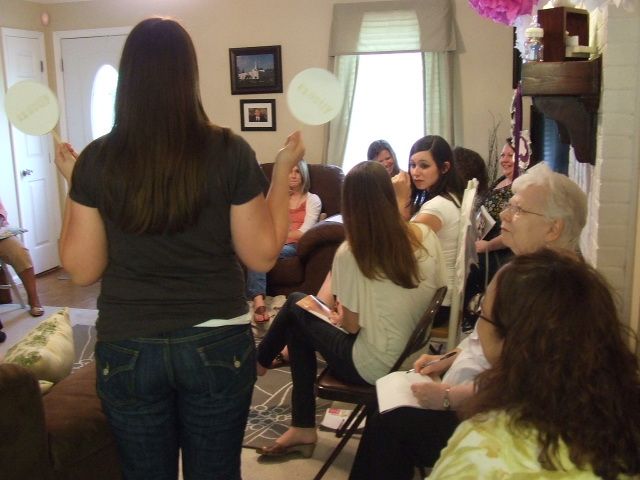
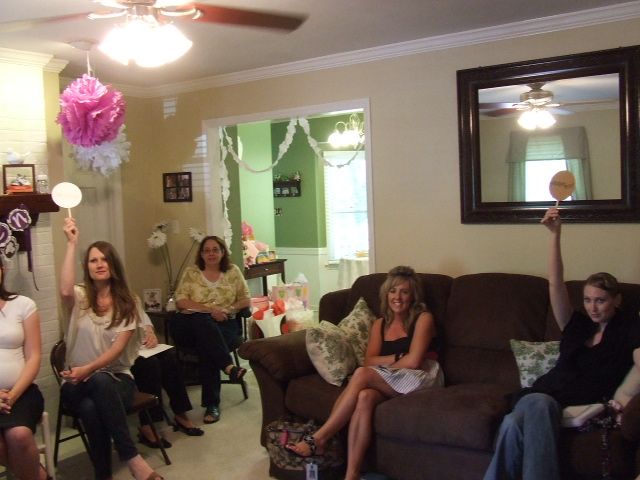
Finally we played a game I named "Exactly or Excrement" It was my take on a game my family loves, Fact or Crap. We had two teams. I read a statement and each team had to decide whether the statement was true (Exactly) or false (Excrement). I made cute little paddles with cardstock circles and popsicle sticks but forgot to get a close up of them. 

Photobucket

 Me (my best side) holding the paddles and explaining the game. The white side says "Exactly" in gold ink. The brown side says "Excrement" in brown ink. I'm mature.

Photobucket

Our team captains PROUDLY displaying their responses. We had a tie and had to have a lame tie breaker cause I was out of facts! The winners got yummy Hersey's nuggets and Smarties. The losers got Tootsie Rolls and Dum Dums.

The shower was lots of fun and I probably wouldn't change a thing (except having a tie breaker question). Thank you so much to my mom, who did SO much work. There was no way I could have done it without her. Also thank you to Brooke, my grandma, aunts and best friend for all the work they did. If you have ANY questions, I'd love to help!

Is a Vintage Wedding for You: the quiz

Skip to the quiz

Over the weekend, we attended a wedding reception. It was very nice. They went with a vintage theme.

It was in a backyard, and the trees were decorated with picture frames hung by ribbons, a little like this photo by Matthew Morgan from another vintage-themed wedding:

The centerpieces were beautiful roses and moss arranged with fine china teacups, which could be a gorgeous centerpiece any time:

Vintage wedding themes are really popular right now. It really worked for this couple. (Well, the bride, at least. I didn't really know the groom.) This theme can create a classic, timeless feel for your wedding.

Ooooor not. A wedding should be about the couple and who they really are, not what they think is popular right now. So how can you tell if a vintage wedding is for you?

I made you a handy little quiz. Ta-DA!


Is a Vintage Wedding for You?

1.) Do you now or have you ever owned any of the following: a pillbox hat, kitten heels, real pearls, saddle shoes, a hat with a veil or feathers, a tea-length ball gown dress, etc.?
a. Are you joking? No! Not since the '80s.
b. Are you joking? You just described basically my whole wardrobe.
c. Huh?

2.) If yes to #1, did you own it because your parents gave it to you/it's part of a costume/you thought it was funny/you are a very ironic hipster?
a. *hanging head in shame* Yes
b. No! Don't be ridiculous!
c. But it was hilarious. You have no sense of humor. (What's a hipster?)

3.) If no to #1, do you know what those things are?
a. I thought you were making them up.
b. Of course. I just haven't gotten around to them yet.
c. Does a micro mini = tea length? Kitten heels = leopard print? (And what's a hipster?)

4.) How long have you wanted to have a vintage wedding?
a. Maybe a yearish? Maybe two?
b. Four or five years and/or pretty much all my life.
c. Ever since I saw these gorgeous wedding pictures on this one website, like last week.

5.) Is there a difference between something that's vintage style and just plain vintage?
a. Not . . . really. Is this a trick question? I mean, I can see you've used the word "style" there, but don't trip me up in these semantics!
b. Of course. Is this a real question?
c. Vintage style looks good, and vintage is when wine was made.

6.) Do you consider leg warmers "vintage"?
a. Uh . . . I guess so. Sure.
b. Are you joking?
c. Yeah. Definitely not vintage style.

7.) Is your gown vintage or vintage style?
a. Not really. But I'm sure it will be. It's a classic.
b. One or the other.
c. Ugh, no. My wedding dress is HOTTT.

8.) Have you swooned over a certain royal wedding?
a. Prince William and Kate Middleton? Of course! It's inspiring my wedding!
b. Prince Rainier and Grace Kelly? Of course! It inspired my life!
c. Snooki got married?

9.) Will the rest of the wedding party be wearing vintage clothes or a vintage style?
a. That's a little much--I mean, not everybody wants to wear that.
b. Yes, and they're going to look AMAZING.
c. Do Bump Its count?

10.) Do you really want a vintage wedding?
a. Duh. Have you seen how cool they look?
b. Duh. I can't imagine having any other kind.
c. Duh. It's the hottest thing this year.

Scoring
Mostly A's: Well. Maybe. I think you should find a theme that fits your own style better.

Mostly B's: Definitely. How could you not?

Mostly C's: Whoa. No. Step away from the vintage! And while we're at it, put down the hairspray and fake tanner!

What do you think? Do you want (or did you have) a vintage wedding? Who are vintage weddings best for?

New winner of vintage fabric squares

We never heard from the first winner selected to win the 10 vintage fabric squares, so we have selected a new one.

The new winner is Allison. Congratulations!

Please email us at waywardgirlscrafts at gmail dot com with your address so we can send your prize!

Gift Bag Toppers

Here is an easy alternative to putting colorful tissue paper in the tops of gift bags. I saw this on a PBS craft series called the Spotted Canary when I was visiting Jordan over spring break. You can check out some other topper ideas on their website. Their directions are a little sparse, so I will show you how I made mine.
I really like this idea because it closes the bag and because you can make even a plain, inexpensive bag look fancy!


First, you will need a gift bag, printed paper and cardstock, paper scraps, glue and embellishments such as stickers, chipboard letters, flowers, jewels, etc. I used a craft knife and ruler, but you can also just use scissors.  (I used the computer to print BABY on my paper.)

Cut the printed paper to the same width as the bag.


Fold the paper in the size you want you topper to be. (Just eyeball it!) Cut off the excess. I used a decorative blade to cut mine. Since the printed paper wasn't very heavy, I backed it up with a coordinating cardstock. I let the cardstock form a border.

Lay the folded paper on the bag, with the fold at the handles. Mark the location of the handles on your topper.


Using your craft knife or scissors, cut an opening (about 1/8 to 1/4" from the fold) between your two marks.
You now should have a slit that will slide right over the bag handles.

Now is the fun part! Make your topper beautiful with your embellishments and scraps. I used my edge punch to create a lacy border. Then I glued down a flower and added pearls in the center.

Here's what it looked like:
I made a gift tag that coordinated and added that, too. It was a hit at the shower for Brooke!

I did think you could take this one step further and use the topper as a card. You could write a message on the inside of the topper for a great keepsake.

Cricut Techniques

This post is the 3rd in a series of 3 posts about Cricuts. To read the first installment, Cricut Basics, check here. The second post is Cricut Beginnings. Here is the third and final installment. Enjoy!

Cricut Techniques
Once I started researching a little for this post I realized how little I know how to do! I do have a few helpful hints from the experience I have that will help you get started. I have included some websites at the bottom for even more advanced techniques such as cutting out fabric, how to make a mat re-sticky, etching glass, etc.

Paper:
  • If you have paper you're nervous about cutting (ie you only have one sheet of the exact right shade), try it on a test piece of similar paper first.
  • You paper can be any size. Someone asked me once if it has to be the same size as your sticky mat and the answer is no. It only needs to be bigger than the image you're cutting. Sometimes if a paper is really thick and small it will move though while the blade is cutting.
  • The best advice I have for what pressure to use is to use your Cricut! You will get a feel for what pressure is best. If it leaves deep marks in your mat- too much pressure. If it doesn't cut all the way through- not enough pressure. Don't be afraid to speed it up either. Don't neglect your blade depth either.
Mats:
  • Try buying them online (Amazon!) they're much cheaper.
  • If your mat is becoming unsticky on one side rotate it around it will work exactly the same going in backwards into the machine.
  • I hate wasting paper so I always try to squeeze more cuts onto a piece of paper. Use the arrows around the "cut" button to position where to start the cut.
Vinyl:
  • It's called "Kiss" cutting and it's not as intimidating to cut as it seems. Kiss cutting is when you cut vinyl lettering with your Cricut without going through the backing.  I would suggest watching a YouTube video
  • On my machine I use Speed 3, Pressure 2, and Blade Depth 3. I have seen other suggestions. You made need to play with your machine to see what doesn't cut through the backing.  
  • You don't really need to get transfer paper. You can use clear contact paper or masking tape to line up letters. 
  • Always cut the letters out on scrap paper first to you can see if the letter size needs to be adjusted.
I hope you have enjoyed my Cricut series! It's not huge but it will get you started! Here are the websites I was talking about with more information with some advanced techniques:

A Minor Delay- Cricut Techiniques coming tomorrow!

My post for today still needs some tweaking so Jasmine has graciously offered for me to take her posting day tomorrow. You only have to wait one more day for the last installment of the Cricut series. Sorry for the delay!

Heaven Sent Baby Shower decor

Brooke's "Heaven Sent" baby shower was a complete success! My mom, best friend and I had so much fun working on this shower. We even put my grandma, aunts, and the guest of honor to work to create everything. Here are some photos of the decor:


The focal point of the room


Tissues pom-poms SO easy. I'd recommend making them the day of and with the ribbon in the wire. 


Proof we made the guest of honor work. This was taken two days before the shower. Brooke wanted to make these.  Super easy and can be used in the baby's room after the shower.


 The "Pomander ball" in action, it's in the smaller box. My mom made another one too. Speaking of my mom:


Here she is working on these Dinner Napkin Snowballs but we used small napkins. They were also easy. We made a bunch and put them everywhere.


I loved how the mantle turned out. We used wooden squares Brooke already had there but put in some shoes she's bought for her baby along with a few board books and baby accessories. (See above photos)


 We used Brooke's Cricut to cut out the circles, clouds and letters for the banner. We just winged the doily flowers and I loved how they turned out. (I know I keep saying that!)


 I got the wings from Oriental Trading Company, but was unimpressed since they were just cardboard cut-outs. My great mom glued feathers and added glitter to give them a little sparkle. We put them on Brooke's chair to make her look angelic.
Isn't she a cute pregnant lady? She is ALL baby!


My best friend took on the challenge to make a large monogram for the shower. I showed her several pictures of monograms with flowers. At the last minute I saw one made out of cupcake liners. It was perfect and Becky made it happen. 


Amazing, isn't it? Brooke can use it in the nursery too!


On the gift table we put some framed pictures of Brooke and her husband as babies. It was alluding to the game we would play later.


I could NOT decide where to put the cloud garland. At the last minute my mom helped me put it up in the doorway to the kitchen. 

Last week I said I'd post everything about the shower but I can't fit it all so next week I'll share the food and the games we played. Stay tuned!