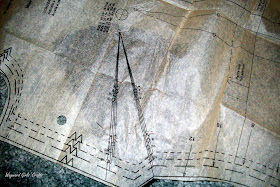
With darts, remember to always go from the widest point to the narrowest point (even in back darts.) Transfer ALL marks from the pattern, especially for the dart, with chalk or sewing transfer paper. You should have something that looks like a triangle.
There should also be a few circles along the outer lines of the triangle.These are important. Fold your dart in half then pin your dart matching the circles on both sides. The circles and the lines should match evenly. Now you're ready to sew!
Your stitch length should be at the basic 2.5. We're starting from the widest part of the triangle. Back stitch 3-4 stitches after starting. Sew until you are about 1/2 inches away from the point of the dart. Reduce your stitch length to 1. Sew all the way to the end of the point. Do not back stitch. Simply cut the threads long and tie a knot. Trim all threads after you're done. Do not serge the dart.
Back Darts:
With back darts, you start in the middle. It's the same concept, start at the widest point and move toward the point of the dart. It is the same steps as the bust dart after that.
Pressing the dart:
First press the sewn area so there is a crisp crease on the fold of the now sewn dart. This won't show on the outside but it will make the dart lay flat. For a dart on the bust, press the dart down. For darts on the back, press toward the center.


Good tutorial.
ReplyDeleteI'm still scared! You need to show me in person and teach me all your skillz!
ReplyDeleteGreat explanation and very clear photos. Thanks bunches for sharing this. I had no idea!
ReplyDeleteI have been sewing for decades and I've never heard of sewing from the middle of a dart and then reducing your stitch length! DUH! It makes perfect sense when you think of it! I have had many a dart go awry when I backstitch! Thanks for sharing such great tips!
ReplyDeleteI am just starting to sew so this could not have come at a better time!
ReplyDeletevery interesting -- thanks for sharing :)
ReplyDelete~Tracy
Great dart tutorial!
ReplyDeleteThanks for linking to a Round Tuit!
Hope you have a great week!
Jill @ Creating my way to Success
http://www.jembellish.blogspot.com/
love the tutorial. thanks for linkin :)
ReplyDeleteThanks for this! I think you may have just made me a little more dangerous with my sewing machine ;)
ReplyDeleteWonderful! Darts can be so tricky and you shed a lot of light on them. I'm going to share this great tip on my blog's facebook page!
ReplyDeleteGreat tip! Thanks for linking this up as well.
ReplyDeleteGreat tip!!! Thanks so much for sharing at the Tuesday To Do Party!
ReplyDeleteSmiles!
Jami
Great tutorial... you make it sound easy. I am determined to sew a dress from a pattern this summer... and maybe even a few other projects too! I just wanted to thank you for linking up last week to Sew Woodsy and let you know that your project will be featured tomorrow!
ReplyDelete