Pages

Neighbor Gift: Cinnamon Popcorn and a Movie

This year I have neighbors! Ok, I've had neighbors in the past, but I've never felt super friendly with them. Now that we own our home, I figured we needed to get friendlier with the people around us. I decided to make cinnamon kettle corn and give this DVD


It's a short movie about the nativity of Christ. The perfect gift for Christmas, in my opinion. You can order your own here: Joy to the World DVD

Cinnamon Kettle Corn recipe adapted from Something Swanky
  • 1/4 cup vegetable oil
  • 1/4 cup white sugar
  • 1 teaspoon cinnamon 
  • 1/2 cup unpopped popcorn kernels
Heat the vegetable oil in a large pot over medium heat, covered.

Put in two kernels. When they pop, the oil is ready

Once hot, stir in the sugar, cinnamon and popcorn.  I use a spoon to help really coat the kernels.

Cover, and shake the pot constantly to keep the sugar from burning.

Once the popping has slowed to once every 2 to 3 seconds, remove the pot from the heat and continue to shake for a few minutes until the popping has stopped. Pour into a large bowl, and allow to cool, stirring occasionally to break up large clumps.


This year I tried making kettle corn in my Stir Crazy popper. AND IT WORKS and doesn't ruin my Stir Crazy! It's so fast and easy. Never going back to stove top. 

Cinnamon Kettle Corn recipe for Stir Crazy:

  • 1/4 cup vegetable oil
  • 1/4 cup white sugar
  • 1 teaspoon cinnamon 
  • 1/2 cup unpopped popcorn kernels
Put all ingredients in the Stir Crazy. Place the lid on top and turn it on. Once the popping has slowed to once every 2 to 3 seconds, turn off Stir Crazy and flip over (so the bowl lid is right side up) and take the heat element off**. Allow the popcorn to cool and enjoy.

**Don't leave the heat element on top while it cools, like I did. It melted the side of the bowl/lid a little. 

DIY Maternity Maxi Dress

Sorry for my long absence! But I have a good excuse. Well, I think it's good. So back in August, I was  asked to be one of my college roommate's bridesmaids. Well well well, what a predicament. The other 7 or so bridesmaids and I did not have something in common that would make dress buying much, much more difficult because I would be 21 weeks pregnant at her wedding! Luckily, the bridesmaids got to choose their own dresses which meant I would make my own dress. I decided to go with a maxi dress thinking it would be both easy to make and accommodating to my growing baby belly. This was far more wayward than I thought but I learned from my mistakes!

What you'll need:
2-2 1/2 yds jersey knit (depending on your height)
Thin elastic
Matching thread

Instructions:
1. Measure from under your bust, over your shoulder to mid back (equal to where your under the bust measurement is on your back). Measure down lengthwise on the fabric. This is the length of A and B. Mine was 30 inches.

2. Hem one side of each A and B pieces. This will be the neckline. Overlap A and B 4 inches right side on top of right side. Pin and sew.

3. Next, sew C to A and B, D to the opposite side, wrong sides together.
4. Fold along mid line of A and B top panel. You may need to trim both sides depending on how loose and flowy you want it. Sew sides of dress (wrong sides together) from bottom to a couple inches above where C and D meet A and B.
5. Measure where you would like to put on the elastic. I measured under the bust to accommodate baby. Cut the elastic 2 inches less than your measurement. Overlap the ends of the elastic about 3/4". Sew forward and back a couple of times. You'll need to put 4 pins in your elastic 4 equally apart: one in the middle front, middle back, and sides. This is markers to match while sewing.
6. Pin your middle front marker of the elastic to the middle front (middle of where A and B overlap), the back marker to the middle back, and sides to where C and D meet on the sides. Your elastic should be smaller than the fabric, this is on purpose! (I added a few extra pins due to how wayward everything was turning out for me. But I pinned in the middle of where the fabric was between pins to the middle between markers and match to fabric. You must be very careful if you are adding extra pins!)
7. Now sew with a zig zag stitch on the elastic to the wrong side of the dress, stretching it to meet the length of the fabric between pins. This will create gathering in the dress.

8. Cut and hem skirt to desired length, hem sleeves at length you want.
9. Optional: I sewed a small piece of where A and B overlap (6 inches from edge of waistline) for added modesty.

And here's my wayward adventure:

I measured wrong both the fabric and elastic, twisted the elastic while sewing, had to unpick thread so many times, etc, etc, etc! .

And here's the finished look!
Note: these were taken at 29 weeks not 21!! Hello belly button!


St. Nicholas Day: A Family Tradition

One of my favorite Christmas traditions growing up was St. Nicholas Day. Although we are members of The Church of Jesus Christ of Latter-day Saints sometimes known as "Mormons" my mom instituted we celebrate St. Nicholas Day on December 6th. St. Nicholas Day is commonly celebrated in European countries. It is thought that Santa Claus bringing gifts is based off St. Nicholas Day. Read more here.

 We set our shoes out on the fireplace hearth on the 5th of December. In the morning they would be filled with a small surprise, like hair things, candy or a small toy. It was a simple tradition but one we looked forward to. As a teenager, I liked to set out my most daring shoe for St. Nicholas. When we went to college, St. Nicholas still found us, via US Mail! His handwriting was strangely similar to my mom's ;)

I plan on carrying on this tradition with my family as well. Just another magical way to make December memorable!


In my husband's basketball sneaker: The Beach Boys's Sounds of Summer.(affiliate link)

In my bootie : Welch's Fruit Snacks, (affiliate link) because I love fruit snacks

In my daughter's boot: We Belong Together by Joyce Wan. (affiliate link) I LOVED this book when we got it from the library and I'm so happy we own it now! It's got really cute illustrations and I think it's perfect for a parent-child relationship or for siblings.

Wrapped and Done by December One RESULTS!


If you'll remember, it was my goal to be done with all my Christmas preparations by December first. This included my Christmas cards, gifts and decorations. Here's how I faired


Cards: Done! My sister-in-law took our pictures, I got that great Groupon and then addressed and sent them on Friday the 28th.

Decorations: Done! I like what I did this year, but miss most of my ornaments. A one year-old baby and breakable ornaments just don't mix. It's nice to have enough room for everything. Here's my nativity:


Gifts: All my gifts to my extended family and in-laws have been shipped! I left my husband and daughter's gift shopping until last week because I wanted to make people who lived far away a priority as to get their gifts shipped. This was good and bad. Good because that got done, bad because I didn't factor in that I'd be ordering gifts online and would need to allow for time to wrap those gifts. So I have 2 gifts coming that I haven't yet received which need to be wrapped. I still feel like I was successful because I won't be stressing about the gifts and I actually enjoy wrapping gifts.

So I think I did really well!! How did you you?

Advent Calendars!

I love a good advent calendar and now's the time to make them! There are so many fun and beautiful ideas out there. We have shared a few of ours in the past.


Musical Advent Calendar Garland is so easy you can make it in an afternoon AND the commitment is pretty low. Can you sing a song a day? Then you can do it!


Jordan's Felt Advent Calendar reminds me of the advent calendar we had growing up. Oh the fights we had over whose day it was to hang up the ornament.


Countdown to Christmas is almost an advent, so it should be included =)


Are you counting down the days yet?

Hashtag alert and Progress Report: Wrapped and Done by Dec 1

Hey everyone, how is your holiday prep going? It's still my goal to be Wrapped and Done by December 1! We've been posting some on Instagram but we want to see what YOU are working on for your holiday prep! Please post using the hashtag #HolidayPrepYall so we can see what you're up to! Plus we will feature you on Instagram!


 Now, here's some of what I've been doing:

Ordering my Christmas cards! I just bought this Groupon to Staples, 100 cards for $19--that's the best deal I've seen ANYWHERE by FAR! But it's EVEN BETTER, knocked down to $8 for 100 because it's been shared with enough friends. There's also a deal for 50 cards Get the deal too before Sunday! Here's one I liked:

(Thanks Brooke, for sending me the link!)


Painting--making my own gift tags!


Wrapping


Bing-ing (Searching using Bing to earn rewards. I've earned $25 for Christmas presents so far. Read more here)


Ibotta-ing (Rebate app, I've earned $18.25 so far )


Shopkicking (App to scan products in store, I've earned $15 to Target so far)


Ordering: presents from Amazon using my Bing Rewards! Win!


(no picture because I can't ruin the surprise!)

Getting our pictures taken, here's my favorite face I made:


Things that still need to be done: Christmas cards addressed, holiday baking, holiday decorating (I refuse to do it until after Thanksgiving, but the day after is just fine), ordering, wrapping and sending more gifts.

So let's see YOUR photos!! Use the hashtag #HolidayPrepYall and we will re-gram it on Instagram!

Getting Facebook Notifications

Do you follow us on Facebook? Why would you want to follow us on Facebook?

  • We post updates about our posts
  • It's a great place to ask a question or for advice (so is email, Twitter, or in our comments section)
  • It has a link to the pins for each post
  • We are trying to post more often on other social media so we can engage with you more (hence the push for Instagram and Facebook).
Do you already follow us (or any other page) and don't see our posts? Here is the simple fix that will take a couple seconds.
  1. Head over to our page. 
  2. Click "Liked"
  3. Click "Get notifications"

That's it!

Teddy Bear Picnic 1st Birthday Party

A few weeks ago we celebrated KZ's first birthday. Her nickname is "Bear Bear" so we decided to have a teddy bear picnic. It was one of the last warm weekends (even though it was mid-October) before fall has fully set in. It was the perfect day! We had the picnic in our backyard with some of our family members and everyone had fun!

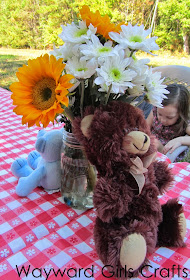
The best part of this party was I only had to purchase a few things! The decorations were all the teddy bears, mason jars, and baskets we could round up in the house. I did purchase the tablecloths (from Party City) but the flowers were leftover from events we attended earlier in the week.


I served sandwiches on kaiser rolls, pickles, chips, teddy bear crackers, and red and green apples. We also served lemonade.

 I had big plans for a beautiful cake but I opted for a simple cake. In addition to the chocolate frosting I used 4 vanilla wafer cookies, and half a pink Starburst. 


For the favors I ordered flavored honey on Amazon, and had gummy bears, and Bit of Honey candy.  The papers said "Thank you for BEE-ING sweet and coming to my party"


Those are some happy people having fun!!

This was one of my favorite parties that I have attended. Mostly because it was the most simple and I got to have fun enjoying the party without the stress!

Happy Halloween! (And FAST costumes!)

My son wanted to be a sword guy after his Mastering Knighthood Summit a couple months ago. He received a foam sword (not pictured, as swords aren't allowed at school) and a shield he decorated there. To make an easy tabard, I asked Summit's Queen Emily. She recommended using a long rectangle of fabric folded in half lengthwise, or even a pillowcase (slit the long sides). Cut a head hole and put a belt on it: BAM. You're a knight.


Like Brooke's daughter and 10,000,000 other little girls, my middle girls wanted to be characters from Frozen. We got storebought dresses from Mom Approved Costumes, which arrived JUST in time. I braided some snowflake Christmas ornaments into Elsa's hair and used gel and hairpins along with white and glitter hairspray. Anna got a white strip of hair (hiding in the back plus more glitter, of course!) and a homemade cloak. I used felt instead of fleece and made the undercape a cape (which Anna's is in the movie) instead of a vest, but mostly followed Eclectic Housewife's Anna Cloak tutorial.


The rest of the morning will be spent sewing on the trim and button.

And of course, we have our troll . . . trolling.


Her costume is a towel cut into a long rectangle. I folded it in half lengthwise and sewed up a couple inches of each side, then cut a head hole. Slip on over a gray sweatsuit, tie on a raffia belt and voila, troll!

She hates it. At least it only took five minutes.

What are your favorite fast costumes?

Halloween 2014 Costumes: Frozen!!

Someone asked me a couple weeks ago what we were going to be. I said "What do you think?" We went for the obvious choice. This is the first year that PB is old enough to pick her own costume and duh she chose Elsa. We do like to pick unexpected costumes, though so without further ado!

I have to admit that "Elsa's" costume was purchased (thank goodness) but the other outfits were DIY.
 Since I didn't have anything to make for her outfit we did kick it up a notch with the hair, makeup, and accessories. So PB always begs to put on my makeup. Well I did for her costume and she hated it! For her make up I penciled in her eyebrows, put bright pink, purple, and blue on her lids, put on a bit of mascara, blush, and lip gloss.
 For her hair I knew I wanted pieces that were swept back and then a side braid. I gave her the choice of which hair style of Elsa's she wanted and this is the one she picked. I started by putting mousse in her hair and pinned back with a slight twist, three section on one side and one on the other to look swept back. I gathered her hair to one side and braided it. I put bobby pins in to secure the style. Then her daddy got to work using a whole can of white hairspray on her hair. She loved the results!!

Do you notice her shoes? Well we have two pairs of the same shoes in a 7 and 7.5. She is wearing the left of both pairs which we didn't discover until we got home!
Isn't this the best? When we were at the dollar store they already had out their Christmas stuff and PB wanted a pack of snowflakes. I was thinking of a cute belt with them but she wanted it to come out of her hand. I tied a ribbon on her wrist and one on her ring finger and tied threads onto them which were tied to the snowflake to keep it upright. To stabilize it on her hand I glued it onto a tan piece of paper.


Can you guess what she is? (Other than extremely cute, of course!) She is a rock troll/Love Expert! I made her little shirt out of an old one of mine and splattered it with white paint. I made her necklace out of Sculpey. I used two different shades of green ribbons for her head band. 


It doesn't get cuter than her!

For the King of Arendelle, I used his regular black suit and popped the collar and pinned it shut all the way up. I made the accessories from Sculpey, red fabric, cording, fringe, fun foam, and a big of cardboard.

For the Queen of Aredelle, I made the dress (not well so I won't go into a tutorial...) with black and purple fabric along with some decorative trim. I used Sculpey for my broach and fun foam for my crown. 


What is the funniest part of all? PB instead wants to be Anna for actual trick'r'treating. Good thing we have one of those dresses too!!

Two things to find in the pictures: Where's Waldo's arm and the pumpkins from last week's post!